![]() Fri Nov 19, 2004 1:14 pm
Fri Nov 19, 2004 1:14 pm
**Tutorial** - Making Custom Cockpits
The following is the short version of how to make a custom cockpit. This is the "expert modder" version, so newbies, you will probably think this is Greek, sorry.
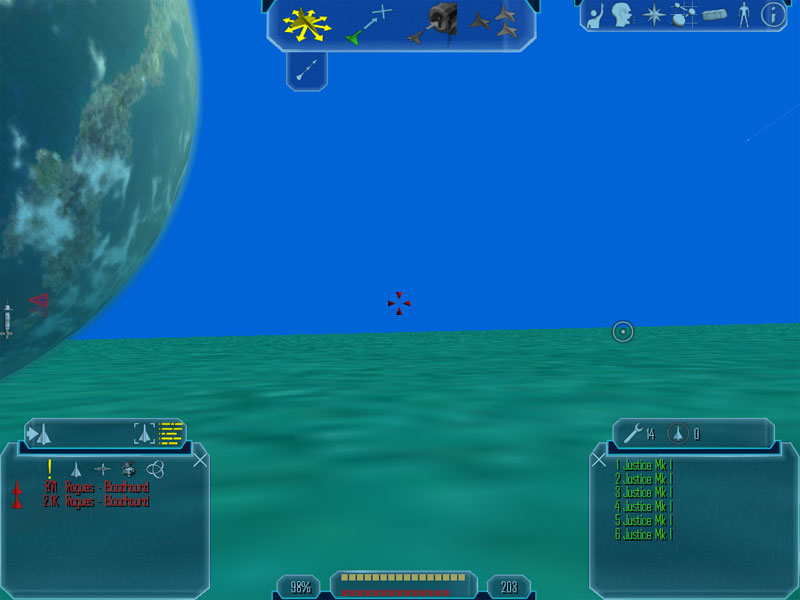
In case anybody thinks I'm full of crap, here's a screenie, and below, after my article, I've put a link to files that contain the MS3D template I've made (which should be very handy for getting scale and position right) and the custom cockpit, which just happens to be a centered crosshair (pretty handy for those modders who're working with fixed-forward gun concepts).
Ok, now to business. Here are the step-by-step instructions:
1. Make your new cockpit geometry.
2. You MUST repeat, must skin it using one material, which must be named uniquely, just like ship materials, and must be DDS. Your model must be ONE GROUP, named Group1. I must emphasize here that it's very important to follow these directions to the letter...
3. Import the model into the template file I have provided you.
4. The crosshair in the template file is very, very close to the exact center of the screen when viewed, and draws correctly (so we know it's at the right distance from the camera). So position and scale your model so that it's much larger then the crosshair, and use the crosshair as a guide for where the center of the player's POV will be. It doesn't matter if your cockpit goes back behind the origin (that part, obviously, won't be viewable). But cockpits should not be too deep- try not to make super-long ones that go a long way past the crosshair.
5. Now delete the crosshair. Make sure that your entire model is ONE GROUP, and that it's using ONE TEXTURE. I can't emphasize this enough... Porche's Star Wars cockpits use multiple models, but this is a much simpler version.
6. Now that you have a cockpit with a texture on it, and you're satisfied that it's positioned correctly and so forth, it's time to test it. Export it as a CMP file to your Desktop or whereever is most convenient. Name it "AlmostThere.cmp", because you're almost there... just a few steps to go!
7. Take that cv_cockpit file I've included here and put it into the DATA/COCKPITS/CIVILIAN/MODELS folder of your mod. If you don't have one yet, make one, of course
8. Now comes the hard part. Open UTF Edit, and use it to open AlmostThere.cmp. Use it to open up the following node/tree: VMeshLibrary-->Group1.lod1.vms-->VMeshData. Now, export the VMeshData and name it "VMeshData" (no file extension). Do the same thing with Group1.3db-->MultiLevel-->Level0-->VMeshPart-->VMeshRef, and save the VMeshRef as "VMeshRef". Close AlmostThere.cmp.
9. Open UTF Edit again, and open the cv_cockpit file I have provided. In it, you will find a VMeshLibrary-->Group1.lod1.vms-->VMeshData and Group1.3db-->MultiLevel-->Level0-->VMeshPart-->VMeshRef, just like you did with your CMP. Import the VMeshData into VMeshData, and VMeshRef into VMeshRef. Keep UTF Edit open for the next step.
10. Two steps to go! Now you need to take care of Materials. Open the Material Library, and you will see a Material labeled "Argh_Crosshair_TEX". Change its name to the unique name you assigned your Material in MS3D in step 2 of this process. And then change the Dt_name to the same name, only with the ".tga" file extension on the end.
11. Now open the Texture Library. Once again, you'll have to rename the texture named "Argh_Crosshair_TEX.tga" to whatever name you assigned. Then click on that Branch, select the MIPS node, and Import your new texture.
Now save your work (with a different name- don't overwrite cv_cockpit or AlmostThere unless you're insanely sure of yourself). Open the model in HardCMP. It should look right- your texture should be on it, and and if you zoom in, it'll be clear that you're model is above the Origin a little bit. This is exactly what we want, of course- the Camera is above the origin, too.
Assuming that your visual check went well... you can now rename cv_cockpit to cv_cockpit.bak or something (so that you don't lose it if you need it later) and then name your new model cv_cockpit.
Now fire up FL and try it out. If you've done anything wrong here... it'll be CTD time, I'm afraid. But even if you've done everything "right", the scale/position may not be what you wanted. In which case, open your working file in MS3D (you *did* save your work there, didn't you?) and then move it, scale it, whatever... export it to AlmostThere.cmp... and repeat the steps. Assuming that your texture displayed correctly on the model... you will NOT have to do those steps again, so after you've gotten that far, it's just a matter of fiddling with it until it's just right.
And that's all there is to it, folks... anybody who's a halfway-decent modder should be able to duplicate my results
Here are the files you will need. good luck everybody, and may you soon make some wicked custom cockpits for us to enjoy!
Edited by - Chips on 11/27/2004 11:46:56 AM